Wade Brainerd


Log Me Out
Remotely controlled desktop computers have been a staple of my all-hours productivity since the mid-90s, starting with VNC and a webcam pointed at the CRT TV attached to my PS2 devkit.
Since 2007, LogMeIn has kept me a happy customer and I have not minded the monthly fee. Lately though; price hikes, stagnant software updates & the TeamViewer hack made me uneasy, and when the LMI client and service began to segfault once or twice a month - that was enough.
Call of Duty ships in November, and I like to take December and early January for back-burner ideas. For 2016, I took a stab at replacing LogMeIn with open source tools.
LogMeIn’s principal features
- Clients for Mac, Windows & mobile
- Strong encryption
- Routing through an intermediate server
- File transfer
Windows PCs support Remote Desktop (RDP) and MacOS ships with a built-in VNC server, and clients for both protocols are available for mobile devices. SSH tunnels can encrypt data sent across the Internet, and I own a private FreeBSD server on 100Mbps fiber to use as the intermediate. File transfer is not critical for me, so I skipped it.
Server diagram
Here is the arrangement I came up with.
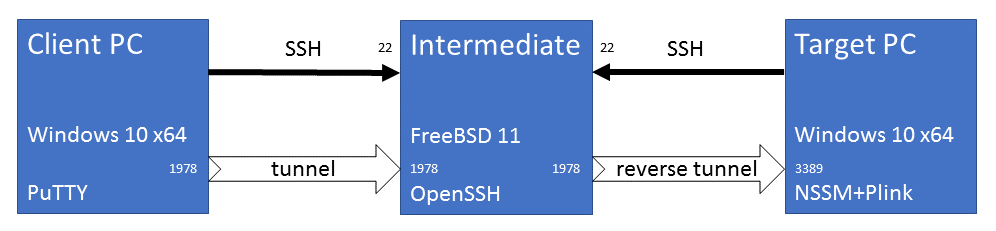
In summary, both the client and target computer establish SSH connections to a common intermediate server, and open tunnels which route some arbitrary port from the client computer to Remote Desktop port 3389 on the target computer.
SSH tunnels
SSH stands for “secure shell” and is typically used to interact with a text-based terminal on a remote computer, but the protocol also supports establishing tunnels between computers.
A SSH tunnel binds to a TCP port on the local computer and listens for incoming connections. Established connections are encrypted & routed to a port on the remote computer. The port on the local computer acts as if it is the port on the remote computer.
A reverse SSH tunnel binds to a TCP port on the remote computer, encrypting and routing packets to a port on the local computer. A reverse tunnel acts as if the remote computer opened a tunnel to the local computer, but the tunnel is initiated by the local computer. This is useful when the local computer has no publicly-facing IP address.
Tunnels can be chained togther through an intermediate computer by using the same remote port number for a normal tunnel and a reverse tunnel. If the target computer establishes a reverse SSH tunnel, and the client computer establishes a normal SSH tunnel to the same intermediate server, the local port on the client computer will act as if it is the local port on the target computer.
The tunnel port on the client and the intermediate server were chosen arbitrarily; for convenience, I use the same port number on both.
Binding on loopback
In the diagram above, the tunnel endpoints are shown inside their computers, in contrast with SSH port 22 which is shown outside the intermediate server.
I made it that way to signify that the tunnel ports are bound only on the loopback network interface, meaning that only processes on the same computer can connect.
Binding on the loopback interface is the default behavior for PuTTY and OpenSSH, and it’s extremely important to not expose tunnels to the entire Internet.
Intermediate server setup
The intermediate server accepts SSH connections from the target and client computer. To limit the risk from the target computer, which is not under my physical control, I created a dedicated tunnel user:
Username   : tunnel
Password   : <random>
Full Name  : Tunnel
Uid        : xxxx
Class      :
Groups     : tunnel
Home       : /home/tunnel
Home Mode  :
Shell      : /bin/sh
Locked     : no
To lock it down, I added this section to /etc/ssh/sshd_config:
Match User tunnel
   AllowTcpForwarding remote
   ForceCommand echo 'This account can only be used for tunneling.'
In short, these settings prevent the tunnel user from executing any shell commands whatsoever, and only allow reverse tunnels to be created.
The man pages for the configuration file are at https://www.freebsd.org/cgi/man.cgi?sshd_config.
Target setup
PuTTY (http://putty.org) is an open source SSH client by Simon Tatham, which provides a lightweight Plink executable that is well-suited to operate the tunnel.
NSSM (https://nssm.cc), the “not-sucking-service-manager”, is an open source tool which wraps a Windows command into a background service.
I use NSSM to start Plink when the computer boots, and to restart it (with reasonable throttling behavior) should the intermediate server or network connection go down.
Many of Plink’s settings can be configured using the command line, but the some are only available through saved sessions.
Sessions are stored in the registry and can be created interactively or by importing a .reg file using the Registry Editor.
Authentication
PuTTY is running as a background service, so authentication needs to be automated. Because the tunnel account is locked down, and because I don’t trust the target computer with my private key, I opted for a randomized password.
Host keys
Host keys are a security mechansim by which the SSH client confirms that it’s connected to the right server and not an imposter. At the time of the first connection, the host key is displayed and the user is asked to verify that they trust that the server is authentic.
The server's host key is not cached in the registry. You
have no guarantee that the server is the computer you
think it is.
The server's rsa2 key fingerprint is:
ssh-rsa 2048 79:22:1a:7f:c7:64:d2:e9:ab:55:1d:9f:90:ad:92:f7
If you trust this host, enter "y" to add the key to
PuTTY's cache and carry on connecting.
If you want to carry on connecting just once, without
adding the key to the cache, enter "n".
If you do not trust this host, press Return to abandon the
connection.
Store key in cache? (y/n)
Assuming the user accepts, the host key is stored in the registry and checked when connecting to that server.
With NSSM, PuTTY runs as the Local System user, and cannot access the desktop user’s host keys or interactively confirm the server. I tell PuTTY the expected host key by including it in the saved session.
Note If PuTTY has already cached the key for a server and you want to see what it is, use the Registry Editor to remove it from HKEY_CURRENT_USER\SOFTWARE\SimonTatham\PuTTY\SshHostKeys.
Keepalive
In TCP, the only way to tell if a connection has closed is to try to send data. Because Plink is just waiting for tunneled connections, the target may not notice a dropped connection for a long time, if ever.
When setting this system up, I frequently found myself in a state where the target computer thought it was connected, but netstat on the intermediate server showed nothing.
I resolved this by enabling TCP keepalive and regular SSH pings in the saved session, and the connection has been stable since.
Installing the service
Create a rdp-tunnel.reg file to load the saved session into the registry. The HKEY_USERS\.DEFAULT\ path allows the Local System user to load the session.
Windows Registry Editor Version 5.00

[HKEY_USERS\.DEFAULT\SOFTWARE\SimonTatham\PuTTY\Sessions\rdp-tunnel]
"Protocol"="ssh"
"PortNumber"=dword:00000016
"HostName"="intermediate-server.com"
"PingInterval"=dword:00000001
"PingIntervalSecs"=dword:00000060
"TCPKeepalives"=dword:00000001
"UserName"="tunnel"
"NoPTY"=dword:00000001
"SshNoShell"=dword:00000001
"PortForwardings"="R1978=localhost:3389"
"SSHManualHostKeys"="xx:xx:xx:xx:xx:xx:xx:xx:xx:xx:xx:xx:xx:xx:xx:xx"
The commands to import the session, install & start the tunnel are:
regedit rdp-tunnel.reg

nssm install rdp-tunnel "C:\Program Files (x86)\PuTTY\plink.exe"
    -v -batch
    -pw xxxxxxxx
    -load rdp-tunnel

nssm start rdp-tunnel
Client setup
The client computer uses PuTTY as well, but this time it will be the GUI executable with public key authentication. NSSM is not required as I prefer to start the tunnel manually before starting Remote Desktop.
A saved session makes PuTTY connect with the right private key and tunnel settings each time. I load up a blank PuTTY GUI, enter the tunnel settings I need, and then select Save Session before connecting.
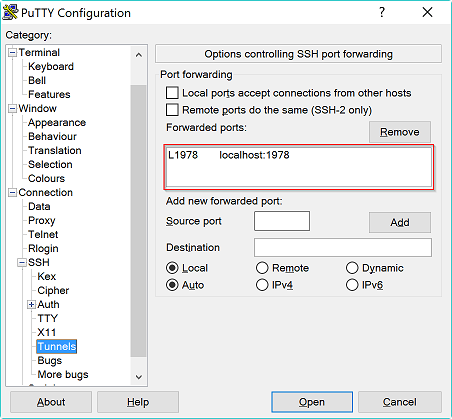
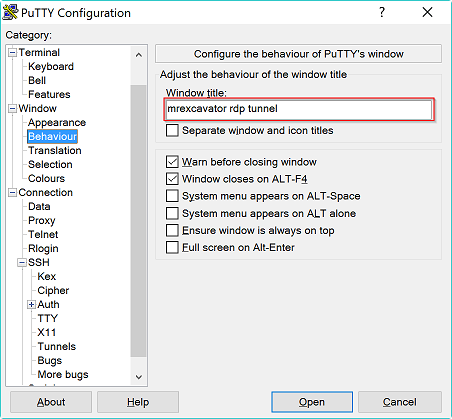
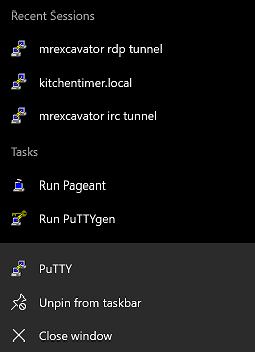
Once the sesion is saved, it can be accessed directly from the Windows 10 Jump List.
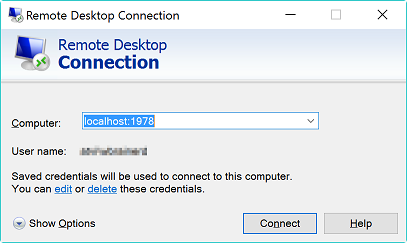
Connecting
First, I connect using the PuTTY saved session and enter my private key passphrase. Next, I connect Remote Desktop to localhost:1978 using a saved Remote Desktop session.
Android client setup
I also occasionally want to do some small thing remotely from my Pixel XL, so it’s nice to have this set up “just in case”.
For Android, I use JuiceSSH Pro and Microsoft’s own Remote Desktop app. Setup is essentially the same as PuTTY.
Results & future work
I’ve been using this system for about a month, and so far it’s never gone down and I’ve been pleased with the performance. Microsoft’s native Remote Desktop clients are far better than LogMeIn’s.
My primary computing devices are a SurfaceBook, two HP workstations running Windows 10, and an Android phone, but I do still own some MacOS computers. At some point I will have to work out the client and target computer setup steps for MacOS, and will update this post when I do.
For security, it would be better to use socket files on the intermediate server, instead of a numbered port. This restricts access to the socket to the tunnel user, instead of any process on the server. However, at this time Plink does not appear to support tunneling to or from a socket file - it gives the error message “Service lookup failed for source port” and the tunnel is not created.
For those who don’t own a fast private server, it would be interesting to try using a service like Heroku as the intermediate server.